


The all-in-one design of the 3GS and other iPhones has traditionally made the taking apart of the handset pretty tricky for amateur users. But with the help of our guides, we can make that a bit easier, which can save you a load of cash if you’re wanting to change the screen or battery especially on older, out of warranty models. Before you start, do make sure that you’ve got all the right tools and that you are confident in your ability to follow the instructions as mistakes can be costly.

1) Turn off the phone and remove the SIM card.
2) Using a small Philips screwdriver, undo the two screws at the bottom of the phone near the charging block.
3) Using a case removal tool or other small shim, you can lever a little of the back off. By running the tool around the phone you will gain good separation.
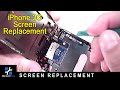
4) For a screen repair, all you will need is a new screen to attach to the motherboard of the  phone. It is connected by three ribbon cables which need to be removed and then attached to the new part.
5) If your part does not come with a front housing, the actual LCD assembly and digitizer can be removed from the phone front by the virtue of six further screws on the front; five along the side and one along the back.
6) Further access onto the motherboard is protected by a silver metal plate which which needs another seven screws – including one beneath the omnious ‘do not remove’ label. Removing this part effectively invalidates your warranty, so be warned. Internal parts are all secured by ribbon cable and can be removed with the case tool.
7) Reassembly is a reverse of these steps. Be sure you know which screws came from which hole as this will make the job easier.
2) Using a small Philips screwdriver, undo the two screws at the bottom of the phone near the charging block.
3) Using a case removal tool or other small shim, you can lever a little of the back off. By running the tool around the phone you will gain good separation.
4) For a screen repair, all you will need is a new screen to attach to the motherboard of the  phone. It is connected by three ribbon cables which need to be removed and then attached to the new part.
5) If your part does not come with a front housing, the actual LCD assembly and digitizer can be removed from the phone front by the virtue of six further screws on the front; five along the side and one along the back.
6) Further access onto the motherboard is protected by a silver metal plate which which needs another seven screws – including one beneath the omnious ‘do not remove’ label. Removing this part effectively invalidates your warranty, so be warned. Internal parts are all secured by ribbon cable and can be removed with the case tool.
7) Reassembly is a reverse of these steps. Be sure you know which screws came from which hole as this will make the job easier.

Post A Comment: